1. 相关命令
1
2
3
4
5
6
7
8
9
10
11
12
13
14
15
16
17
18
19
20
21
22
23
24
25
26
27
28
29
30
31
32
33
34
35
36
37
38
39
40
41
42
43
44
45
46
47
48
49
50
51
52
53
54
55
56
57
58
59
60
61
62
63
64
65
66
67
68
69
70
71
72
73
74
75
76
77
78
79
80
81
82
83
84
85
86
| # 远程
origin main
origin branch_test
# 本地
main
branch_test
# 三层
# remote
# Local
# Disk
# 修改代码步骤
https://www.bilibili.com/video/BV19e4y1q7JJ
# 1. remote-->Local、Disk
git clone xxx
# 2. 新建分支,并且将main分支的代码拉到branch_test上
# 方式1 在main分支下
git chechout -b branch_test
# 方式2
# 查看当前所有分支
git branch -v
git branch -a
# 创建分支
git branch branch_test
# 切换分支到branch_test
git checkout branch_test
# 拉取本地Local的main分支
git pull main
# 切回到main,其中"_"表示切换到上一个分支
# git chechout -
# 3. 在branch_test分支下,修改代码(修改的是Disk上的代码,所以Disk上的文件和Local上的文件不一致)
# 查看有什么改变?
git diff
# 4. 将Disk上的文件拷贝到暂存区
git add .
# 5. 将暂存区的文件推到Local中
git commit -m "更新信息"
# 6. 将Local中的文件推到Remote
# 这一步之前可以**先看看main分支有没有更新**,有更新的话直接跳到7, 没有更新的话可以执行
# git push origin branch_test
# 正常上面已经结束,只需要提交pull request到main就行了,但是
# 7. 注意:push到origin branch_test之后,发现origin main已经更新了,怎么办
# 切换到main分支
git checkout main
# 拉取远程origin main分支,执行之后,origin main 就同步到了Local的main和Disk
git pull origin main
#
main 更新之后的main
branch_test
所以后面,需要在Disk上合并这两个分支
# 切换到branch_test
git checkout branch_test
# 在main上合并branch_test, ❌这里为什么用git rebase main, 而不用 git merge main ??
# 这样Disk Local上的branch_test就是 **新更新的main+自己修改的branch_test** 的内容,如果rebase conflict,手动选择哪一段代码
git rebase main
# 8. 再测试 **新更新的main+自己修改的branch_test** 的内容,有没有问题
# 9. 有问题再修改推到Local(git add . git commit -m ""),修改完推到Remote(或者没问题)
# 在branch_test分支下
git push -f origin branch_test
# 10. 推到origin branch_test之后, 需要new 一个pull request(将origin branch_test分支pull到origin main)
# 11. 在main分支review,没问题的话Sqush and merge,将将origin branch_test分支合并到origin main
# Sqush:将这个分支上的所有改变,合并成一个改变
# 12. 一般情况下,被merge之后,
- 删掉 origin branch_test
- 删掉 branch_test
git checkout main
git branch -D branch_test
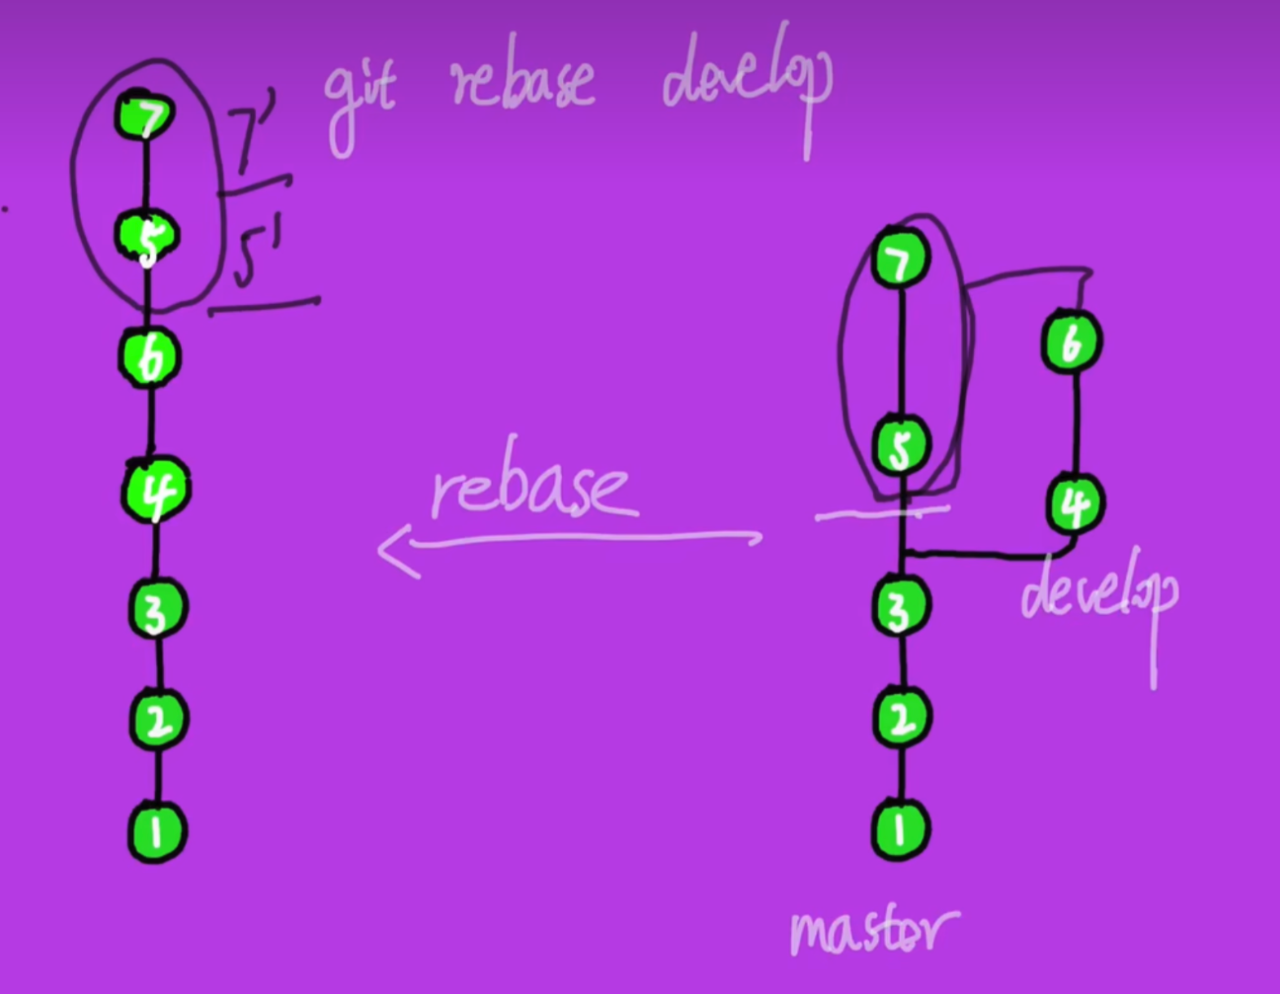
# ❌这里为什么用git rebase main, 而不用 git merge main ??
git rebase 之后结构更简洁,减轻大量merge线条太多的问题
git merge 能保留原有的分支结构
|
2. git merge 和 git rebase区别
1
2
3
4
5
6
7
8
9
10
11
12
13
14
15
16
17
18
19
20
21
22
23
24
25
26
27
28
29
30
31
32
33
34
35
36
| # 新建、切换到branch_test分支
git chechout -b branch_test
# 切换到branch_test分支
git chechout branch_test
# 隐藏本地的修改(目的:拉取远程origin main分支的数据时,不会冲突)
git stash
# 拉取远程的最新分支
git pull --rebase origin main
# 显示本地的修改
git stash pop
# 1. 添加所有修改到暂存区
git add .
# 2. 提交修改 (请把引号内的内容换成您的实际提交信息)
git commit -m "feat: 完成了xxx功能/修复了xxx问题"
# 3. 推送到远程的 branch_test 分支
git push origin branch_test
看是否有冲突,有冲突的话,手动选择用哪个分支~
|
Git 分支重命名指南:将 branch_test 改为 dev
这是一个涉及“本地改名”+“远程同步”的操作。由于 Git 的远程分支本质上是和本地分开的,所以我们需要分步完成:先在本地改名,推送到远程,最后删除远程旧名字。
请依次在终端执行以下 3 步命令:
1. 本地分支重命名
这会把您当前的 branch_test 改名为 dev。
(如果您当前就在 branch_test 分支下,可以简写为 git branch -m dev)
1
2
3
|
git branch -m branch_test dev
|
2. 推送新分支到远程
这会将新的 dev 分支推送到远程仓库,并让本地 dev 自动关联它。
1
2
3
|
git push -u origin dev
|
3. 删除远程的旧分支
这一步会把远程仓库里原来的 branch_test 删掉,彻底完成更名。
1
2
3
|
git push origin --delete branch_test
|
常用命令
1
2
3
4
5
| 拉取远程的分支,丢弃本地
git fetch --all && git reset --hard origin/main && git clean -fd
将本地代码推送到远程
git add . && git commit -m "obsidian auto commit" && git push
|